
No products in the cart.


DomainKeys and DKIM can help you to increase the reputation of your e-mail server and preventing others to manipulate or fake your e-mails.
DomainKeys is a deprecated e-mail authentication system designed by Yahoo to verify the domain name of an e-mail sender and the message integrity. Aspects of DomainKeys, along with parts of Identified Internet Mail, were combined to create DomainKeys Identified Mail, which is now widely used.
DomainKeys Identified Mail is an email authentication method designed to detect forged sender addresses in email, a technique often used in phishing and email spam. DKIM allows the receiver to check that an email claimed to have come from a specific domain was indeed authorized by the owner of that domain.
In this tutorial, we want to show you how you can activate this feature in cPanel and Plesk. Firstly, we have to clarify that Plesk allows you to activate DomainKeys in the web interface and that cPanel is using the newer version called DKIM. Those are both quite similar in many points, but we will use those terms separately. All the images in this tutorial can be shown in a bigger version with all the details, by clicking on them. We will often use the example domain “yourdomain.com”. It has to replace with your own one, whenever it appears.
DKIM in cPanel
After you logged into your cPanel account, please search for “Email Deliverability” in the search bar. After opening the matching tool, you might see that problems exist with DKIM and SPF at some of your listed domains. In this case, please click on the “Manage” button in the line of the required sending domain. The opening site should now look like this, possibly with an error message that your system does not control the DNS server:
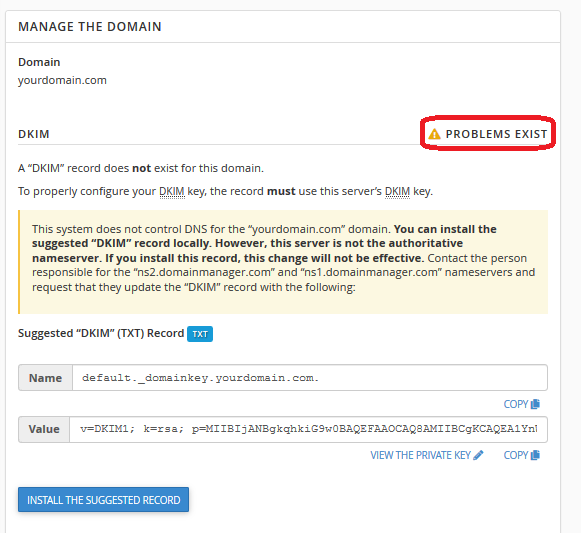
If you have your own server with cPanel and you are using it as a name server, the configuration of DKIM might be finished already. In that case, the status of your DKIM configuration is not “PROBLEMS EXIST”, as shown in the image above. It is then already shown as “VALID”. If problems exist, please click on “INSTALL THE REQUESTED RECORD”. Afterwards, DKIM is shown as valid.
If you are not using your cPanel as a nameserver, as is always the case when using our Webspace, you will have to manually transfer the record to the DNS zone on the responsible DNS server for your domain. Please log in to the web interface of your domain registrar and add a TXT record for the subdomain “default._domainkey.yourdomain.com”. “your domain.com” has to be replaced with your own domain. The data part of the record has to be filled with the character string you see next to “Value” in cPanel. It begins with: “v=DKIM1…”. Now please log into the Control Panel domain, navigate to: DNS Zone Management and edit your DNS Zone.
When you now reload the tool “Email Deliverability” in cPanel and click on “Manage” next to your domain again, the following should be shown:

If you can see the same message, DKIM has been activated successfully!
Regarding the SPF errors that might be shown below the DKIM section, please ignore those messages.
DomainKeys in Plesk
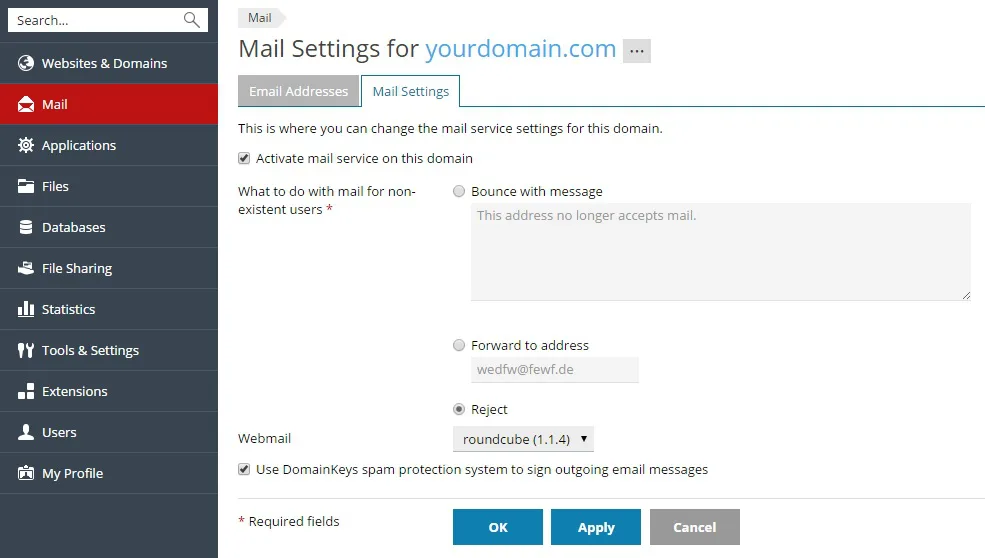
Please search in the search bar for: “Mail Server settings” and open the tool. At the point: “DomainKeys spam protection”, please check the Box “Allow signing outgoing mail”. Afterwards, you have to change to the “Mail Settings” of your domain and activate “Use DomainKeys spam protection system to sign outgoing email messages ” there, like in the following screenshot:
Then you can open the “DNS Settings” for the affected Domain. An additional TXT entry for the subdomain: “default._domainkey.yourdomain.com” should have appeared.
![]()
If it is missing, please repeat all the steps so far, but first, delete the tick at “Allow signing outgoing mail” in the Mail Server Settings and set it again after saving. If you are using your Plesk as a nameserver, the configuration should be finished now. You should now test the configuration. More about this step in the later point: How to test DomainKeys and DKIM.
If you are using other nameservers for your domain, you have to copy the data part completely and add an identical record in the zone there. To do so, please log into the Control Panel of your Domain, go to the DNS Zone Management and edit the Domain. Please add, a TXT record for the subdomain “default._domainkey.yourdomain.com” with the data part generated by Plesk.
As you can see in the picture, a second record has to be added. This one defines the policy, that every e-mail has to have a DomainKeys signature. Please add the subdomain “_domainkes.yourdomain.com” with the TXT record: “o=-“. With this last step, the configuration of DomainKeys has been finished. To ensure that everything is working perfectly, you should do a test now!
How to test DomainKeys and DKIM
A good way to test a DKIM or DomainKeys configuration is the DKIMValidator.
After opening the site, you can see a randomly generated e-mail address. Please write an e-mail from your server to this address and, after a few seconds of waiting, open the analysis report with the button “view results”. With Strg + F, you can search the site, which gives you a lot of information. To check if DomainKeys and DKIM are working, search for “result =”. If it reads “pass”, everything is working fine. If there is a “fail” you should start a search for the cause. If you are stuck at some point, you can contact us anytime under the e-mail address [email protected]. Our team of experts will stand by your side to get it working!
You may also like

Instagram currently has three different types of Instagram accounts: personal, business and creator. Once you have your ...

Table of Contents Toggle Backlinks:Social signals:Brand awareness:Content creation:Maximize the benefits of influencer m...

Table of Contents Toggle Basics of vector graphicsEssential vector toolsMain techniques of vector illustrationThe fundam...

Table of Contents Toggle What is Internal Server Error 500?How to Fix “the 500 Internal Server Error” in Wor...
 Web Hosting
 Web Designs
 Graphic Design
 SEO
SEO Digital Marketing